Create custom event fields
Creating custom fields allows you to include categories of information in your events that don't appear by default on the add/edit event form. Fields that are customized for your events can help visitors to your published calendar find what they're looking for more quickly.
Custom fields used internally can help calendar editors keep each other up-to-date. For example, you can include fields for team information, event editor notes, and so on.
By choosing not to publish these fields, you can keep them from appearing in your live calendars.
Tip If your Trumba implementation has more than one Publisher account, or you coordinate events with another organization, you may want to share one or more custom fields across accounts. Learn more.
Create new custom event fields
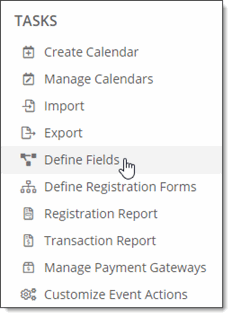
- In the Trumba editing environment, under Tasks, click Define Fields.

- On the define fields page, find the event template to which you want to add fields.
Tip If you don't see the template you're looking for, in the Publication drop-down list, select [all publications].
- In the template box, pause your cursor over Add Custom Field, and then select Create New Field.
- On the Create a New Custom Field page, in the Field Name section, for Field name, type a name for the new field. (When you're choosing a name, remember that field names show up on your published calendars.)
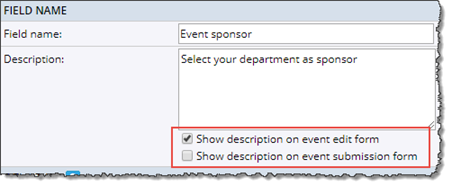
- For Description, provide information to help event creators/submitters understand the field's purpose and how best to add content.
By default, the description appears as hover text when event creators pause their cursors over the field in the add/edit and/or event submission forms.
To display the description text below the field, select the appropriate check boxes.

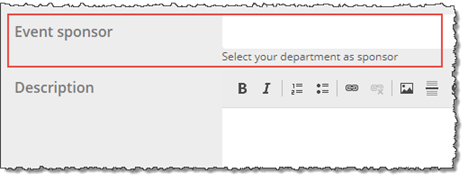
Here, for example, is the Event sponsor field, defined above, as it displays on the add/edit event form. The description appears below the field.

- For Field type, select the type of field you want to create.
- For all field types, you see the following options:
- Default value If event creators typically use a certain value for the field, type or select a default value. Otherwise, leave Default value blank.
For example, for an age range field, if most of your events are targeted at a specific age range, you can make that age range the default.
- Value required If you want to ensure that the field has a value in every event that's created, select Yes. Event creators who don't provide a value see an error message when they try to save. Otherwise, select No.
For example, if you require a value for an Event Type field, every event must include the event type, and calendar visitors can filter through all of the events by type in the published calendar.
- Default value If event creators typically use a certain value for the field, type or select a default value. Otherwise, leave Default value blank.
- The other options you see depend upon the type of field you're creating. For example:
- For a Single line of text field, you can specify the minimum or maximum number of characters the field can contain.
- For a List of choices field, you're asked to name the list and add the value choices the list contains. For example, if you create an Audience list of choices field, possible value choices might include Adults, Teens, Children, and Seniors.
Tip When you're first creating a list of choices field, the quickest way to add the value choices is to click Add Multiple Values. In the text box that opens, you can type the list of values, placing a comma after each value.
You also see some additional options:
- Select multiple values For an Audience field, you might select Yes to allow event creators to indicate that an event is appropriate for multiple age ranges. For an Event Type field, on the other hand, you might select No if events can be of one type only.
- Field delimiter When multiple values can be selected, you can customize the character that is shown between each value.
The delimiter must be a single character but can include a space before and/or after the character to format the display appropriately.
The default delimiter is a comma followed by a space (", ") so multiple values would be shown as "Value 1, Value 2, Value 3". Some delimiters such as a slash may display better with a space before and after the character. For instance, a delimiter of " / " would display multiple values as "Value 1 / Value 2 / Value 3".
Important The delimiter is also used when exporting and importing values in feeds so be sure any incoming feeds use the delimiter character to separate multiple values.
- Display style Decide between displaying the list of choices values:
- Inline: inline radio buttons for single-select fields or inline check boxes for multi-select fields.
- Drop Down: drop-down list including all available values, with check boxes for multi-select fields.
- Drop Down - Auto Complete: drop-down list including all available values, but users can filter the list to what is being typed (making this a good choice for a medium long list of values -- 30-300 is a good guideline).
- Auto Complete: drop-down list showing only those values that match what is being typed, and not any of the others in the list (making this the best choice for fields with a very long list of values -- 300 or more).
I'd like more detail about the list of choices display style options.
- Under Include in Templates, from the Templates drop-down list. select the templates in which you want to include the field.
- In the Security section, for Visibility, two options are selected by default: Allow this field to be published and Show this field on the event submission form.
- Allow this field to be published means that the custom field is publicly displayed in events on your website calendar.
Otherwise, with Allow this field to be published left blank, the field doesn't appear with (or, will be hidden from) the events on your published calendar.
Tips- If you're creating a custom field for internal use only, clear this option.- If you want to publish this field with one (or more) calendars, but not with all of them, clear this option, and then override this setting for selected calendars. See Display unpublished fields.
- Show this field on the event submission form means that, if the public event submission form is enabled on your account, this field is also included on that form.
If you don't want the field you're creating to appear on your event submission form, clear this option.
I'd like more information about letting calendar visitors submit events.
- Select Show this field on the registration report to include the field you're creating in the calendar-level registration reports and feeds you generate. Select this option if you're extracting event registration data for use in another context where a specific custom field's values are required.
For more information, go to Calendar-level registration reports and Registration feeds.
- Select Show this field on the transaction log report to include the field you're creating in the transaction log reports and feeds you generate. Select this option to include custom event registration data (for example organization or department) in the transaction log report, for accounting or other purposes.
Important This setting is available only for accounts that have paid registration enabled. (To enable paid registration, contact Sales.)
For more information, go to View paid event transaction reports.
- Allow this field to be published means that the custom field is publicly displayed in events on your website calendar.
- Click OK.
Tip In some calendar views, you can change the way fields are displayed. Learn more.
Share custom fields
If your Trumba implementation has more than one Publisher account or you coordinate events with another organization, you may want to share one or more custom fields across accounts. Sharing fields promotes consistency and saves time by avoiding duplicated effort.
To share a field with another account, talk with your Trumba Client Services representative about enabling the sharing fields feature on your account.
To share a custom field
- In the Trumba editing environment, under Tasks, select Define Fields.

- On the define fields page, find an event template that uses the field you want to share.
Tip If you don't see a template that uses the field you're looking for, in the Publication drop-down list, select [all publications].
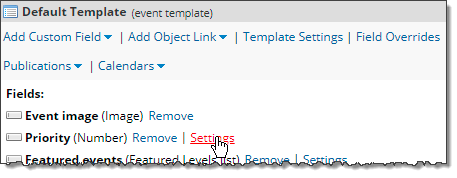
- To the right of the field name, click Settings.

- At the bottom of the Edit Custom Field form, click Share.
- On the Sharing for Field page, select the email address associated with the Trumba account with which you want to share the template.
Or, under Enter email addresses..., type the email address.
- Click Add to Shared List.
- At the bottom of the page, click Done.
To use a field that is shared with you
- In the Trumba editing environment, under Tasks, select Define Fields.

- On the define fields page, find an event template in which you want to include the shared field.
Tip If you don't see a template you want, in the Publication drop-down list, select [all publications].
- Pause your cursor over the Add Custom Field link to see a list of fields.
- Under User Defined Fields, select the field that was shared with you.
Tip Because you can't modify fields that are shared with you, clicking the Settings link to the right of the field name won't open the Edit Custom Field form.
