Create custom registration forms
To implement the registration questions, instructions, and section headings that you create, you add them to a custom-built registration form, and then apply the form to the events for which you want people to register.
Important You need to create the custom questions, instructions, and section headings that you want to add to your form before you build the form. See Custom registration form content.
Topic links
- Build a custom registration form
- Apply your registration form to an event
- Copy or remove a custom registration form
- Share custom registration forms
Build a custom registration form
- In your Trumba editing environment, under Tasks, click Define Registration Forms.
- On the Define Registration Forms page, under the Registration Forms section, click Add registration form.
- Enter a form name and description.
Your new form becomes available on the Registration tab when you edit an event, and the name you enter here is the name that appears in the list.
- In the Security section, select the owning calendar.
If you'll be using the custom form to add events only to a specific published calendar, make that calendar the owning calendar.
Important You grant edit rights to this form by granting edit rights to the calendar that you assign here as the owning calendar. To grant edit rights to this form to editors who only work in (and have edit rights to) other calendars, see Share custom registration forms later in this topic.
Tips
- It's a good idea to assign the same owning calendar to both a custom form and the custom questions it contains. Learn more about custom questions.
- To save time and eliminate errors for the editors who are creating the events, you can set the custom form as the owning calendar's default form:
- In the editing environment in the calendar list, click the name of the owning calendar to make it active.
- Above the calendar, click Calendar Settings.
- Under Default Event Settings, for Default Registration Form, select the custom form.
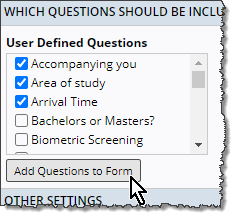
- Under User Defined Questions, select the check boxes next to the questions you want to add to the form, and then click Add Questions to Form.

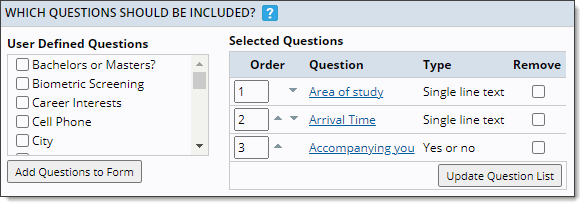
A Selected Questions box appears on the right, listing the questions you added.

- Use the Order column or the up and down arrows to rearrange the order in which the questions appear on your registration form.
You can remove a question (or add another question) if you change your mind.
If you've made any changes, click Update Field List to refresh the Selected Questions grid.
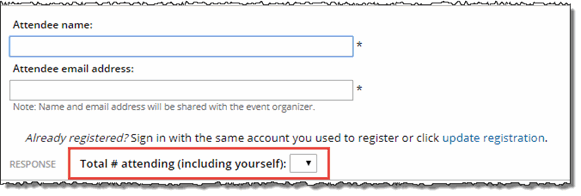
- Under Other Settings, update the Number attending label field if you'd prefer to use a custom label, as is highlighted in the image below. The default is "Number attending (including yourself)."

When guests are allowed for an event, custom text you enter here appears on the published registration form, as you can see here:

- Click OK when you are done editing the form to add it to your registration form list. See Set up event registration.
Apply your registration form to an event
After you've created the custom registration form content (questions, instructions, and section headings), and added it to your custom registration form, you can use the form with your registration events.
To apply a custom registration form to an event
- In your Trumba editing environment, display the calendar to which you want to add an event (or that contains the event you want to edit).
- Click Add Event to create a new event, or open an existing event for editing.
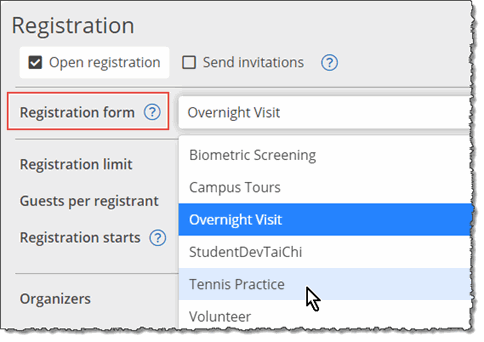
- On the Registration tab, for Registration form, select the custom form you created.

Note The event must be either an open registration or invitation-only event, or a combination of both, to apply a registration form. See Set up event registration.
- Set up any other registration settings you want, and then click OK.
Copy or remove an event registration form
If you want to add a new registration form that's similar to one you already created, you can base the new form on your existing one. That way, you need to edit only the settings that are unique.
If you no longer need a particular form you created, you can delete it. When you delete a registration form, any events that use it will show the default registration form. If you want these events to use a new custom form that you create, you need to apply the new form to each event manually.
To copy or remove a custom registration form
- In your Trumba editing environment, under Tasks, click Define Registration Forms.
- On the Define Registration Forms page, in the Registration Forms section, click the name of the form you want to copy or remove.
- On the Edit Registration Form page, click Create Copy or Delete This Form.
- If you created a copy, the new form appears, and you can edit it as necessary, and then create the new form.
If you deleted the form, an alert appears to let you know that events that use the form will now show the standard (default) registration form. If that's okay with you, click OK to delete the form and return to the Define Registration Forms page.
Note When you delete a registration form, you don't delete any of the custom questions that appeared on it. The questions are still available under the Registration Questions section of the Define Registration Forms page.
Share custom registration forms
Take me direclty to the instructions for sharing a custom form.
As the publisher who creates a custom registration form, you may need to make the form available to the editors who add and edit the events on your published calendars. You can make the form available to the editors by sharing the form with the editors' accounts.
Notes:
- You can't directly share the custom form itself. To give editors who create events access to a custom registration form, you share the custom form's owning calendar.
- You set the owning calendar as part of the process of building the custom form.
- For editors to have access to the custom form as they create events, you must share the owning calendar with them with Can add, delete, and change content permission.
When deciding how to assign a custom registration form's owning calendar, consider how the custom form is used within your particular implementation:
- If the editors who use the custom form add events to the same single published calendar, you can make that published calendar the custom form's owning calendar.
- However, if a custom form is used by multiple editors who add events to different published calendars, take these steps:
- Share each published calendar with the editors responsible for adding and editing that calendar's events.
- Create an unpublished calendar to hold the custom registration form.
- Set the unpublished calendar as the custom form's owning calendar.
- Share the unpublished calendar with all editors who need access to the form, giving each editor Can add, delete, and change content permission.
This approach gives all editors access to the custom form. At the same time, it prevents any editor from inadvertently adding, editing, or deleting events on the wrong published calendars.
Tip If you share custom registration forms with different groups of editors, you may need to set up more than one calendar to hold the custom forms.
To share a custom registration form
- Read the introduction to this section to decide how to assign the custom registration form's owning calendar.
If necessary, create an unpublished calendar to hold the custom registration form.
- Build the custom registration form. Or, if you've already built the form, follow the instructions for editing the form's settings.
- On the Edit Registration Form page, in the Security section, for Owning calendar, select the published calendar or unpublished calendar (which holds the custom registration form) that you intend to share with editors. Click OK.
- Back in the calendar list, click the name of the owning calendar to make it active.
When a calendar is active, it's name is bold and has a black checkmark beside it.
- Share the calendar with the appropriate editors.
Grant each editor Can add, delete, and change content permission to the owning calendar.
- Tell the editors to try adding an event to the published calendar for which they're responsible.
On the add/edit form's Registration tab, in the Registration form drop-down list, the editors should see the custom form you shared.
