Set up special repeating and multi-day cases
This topic describes how to set up events in the following specific scenarios:
- Events that repeat only certain days of the week
- Events that repeat on different days each week
- Events that repeat but not every day, week, month, or year
- Repeating events that start and end more than once on the same day
- Multi-day events with one start and one end time
- Multi-day events with the same start and end times on each day
- Multi-day events with different start and end times each day
For general information, see:
Tips
- The following instructions assume that the calendar to which you're adding events is active, and that you're already working in the add/edit event form (see: Add events).
- When setting up repeating and some multi-day events, you see the No end date option. Even if an event has no known end date, it's best to specify one. For example, for a daily or weekly event, you might specify an end date in a year. For a monthly or annual event, you might specify an end date in five years.
If you do select No end date, Trumba imposes its own limits: Daily and weekly events have a two-year limit; monthly events a 20-year limit; and annual events a 200-year limit.
Important Because you can't change recurrence patterns after the fact, you can save time by verifying that you have the correct pattern beforehand.
Events that repeat only certain days of the week
Example
- A health club offers a class that meets only on weekdays.
How the setup looks
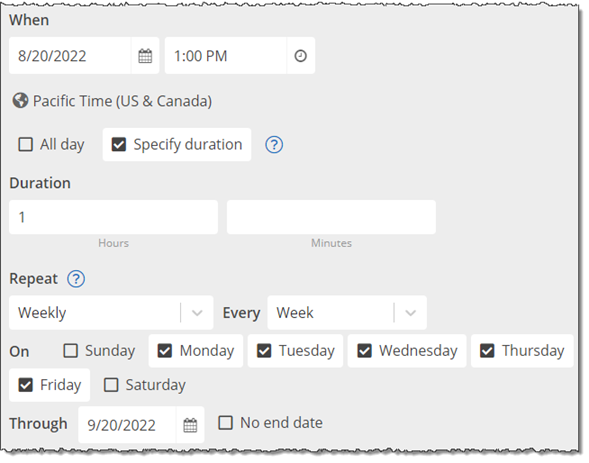
Setup instructions
- On the add/edit event form, on the Event Information tab, select the date and start/end times (or specify the duration) for the first event.
- For Repeat, select Weekly and Every Week, and then select just the weekdays.
- For Through, select the end date.
- Click OK to save the event.
Events that repeat on different days each week
Example
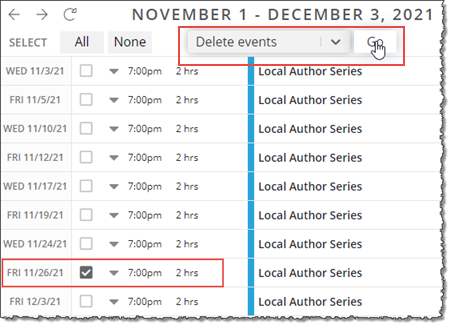
- A Local Authors reading series at the library meets on most Wednesdays and Fridays throughout the fall. However, there are exceptions, such as the Friday after Thanksgiving.
How the setup looks
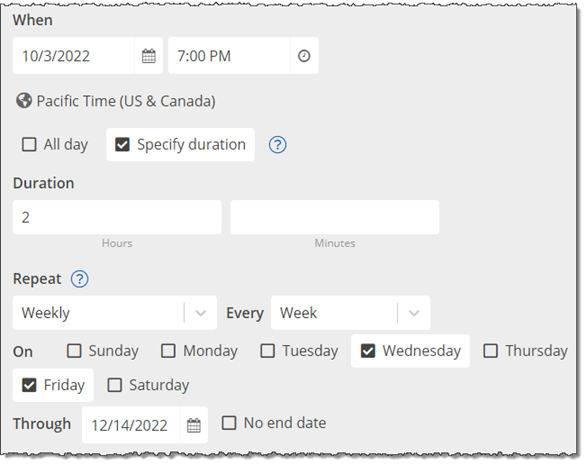
Initially, select all the days on which the repeating event will occur. As described under Setup Instructions, you can quickly delete the events that won't actually occur (for example, the one scheduled for the Friday after Thanksgiving) later.
Setup instructions
- On the add/edit event form, on the Event Information tab, select the date and start/end times (or specify the duration) for the first event.
- For Repeat, select Weekly and Every Week, and then select all the days of the week on which the event will occur.
- For Through, select the end date.
- Click OK to save the event.
- Above the calendar, click List to see the calendar's events as a list.
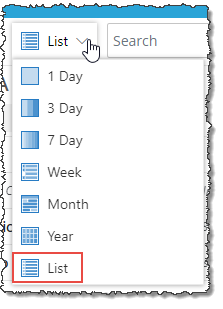
- Find the repeating event you just set up. Select the dates when the event won't occur. In the action list above the calendar, make sure Delete events is selected, and then click Go.
Events that repeat but not every day, week, month, or year
Example
- A yoga studio offers a half-day meditation workshop on Saturdays, every third week.
How the setup looks
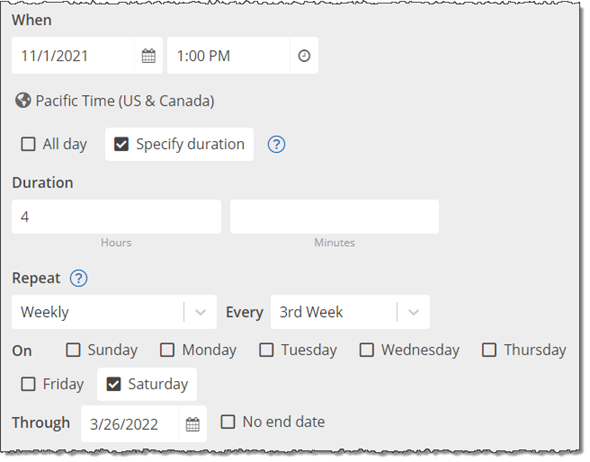
Setup instructions
- On the add/edit event form, on the Event Information tab, select the date and start/end times (or specify the duration) for the first event.
- For Repeat, select Daily, Weekly, Monthly, or Annually.
- Select the Every and, in some cases, On options you want.
For example, these are the options you see for a repeating monthly event that occurs on the 31st of each month:
Tip For months that don't have 31 days, Trumba automatically places the event on the last day of the month. Similarly, for events set on the fifth occurrence of a particular day of the week each month, when a month doesn't include five of those days, Trumba automatically places the event on the fourth occurrence of the day for the month.
- On options:
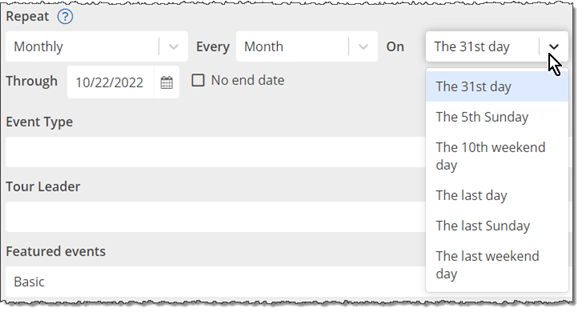
- On options:
- For Through, select the end date.
- Click OK to save the event.
Repeating events that start and end more than once on the same day
Example
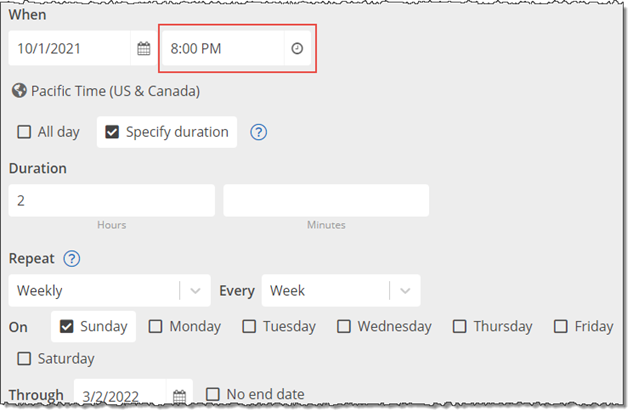
- During its month-long run, a theatre offers two performances on Sunday, a 3pm matinee and a 8pm evening performance.
How the setup looks
Set up the repeating event with the earlier time, and then scroll to the bottom of the form and click Create & Copy.
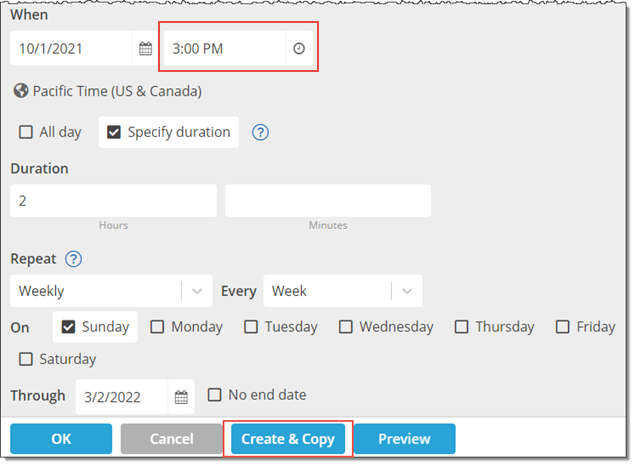
For the copy of the event, change the event time to the later time. Either click Create & Copy again to create another copy with a different time, or if it's the last occurrence you need to create, click OK.
Setup instructions
- On the add/edit event form, on the Event Information tab, select the date and start/end times (or specify the duration) for the earlier event.
- For Repeat, select the repeating pattern you want.
- For Through, select the end date.
- At the bottom of the add/edit event form, click Create & Copy.
This adds the earlier event to the calendar, and leaves the add/edit event form open with the original setup information in place.
- For the copy of the event, change the start time to the start time of the later event (plus any other information that differs from the earlier event).
- To make another copy, repeat steps 5 and 6, or if this is the latest event of the day, click OK.
Multi-day events with one start and one end time
Example
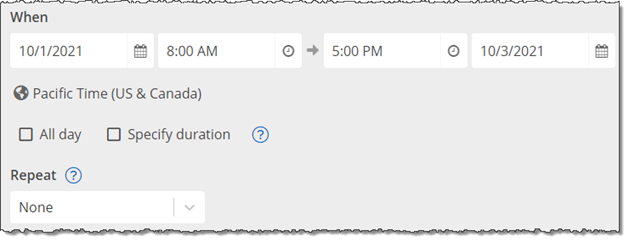
- A health club sponsors a three-day meditation workshop at a rural retreat center. Participants leave the club by bus at 8am on the start day and return to the club at 5pm on the end day.
How the setup looks
Setup instructions
- On the add/edit event form, on the Event Information tab, select the date and time that the multi-day event begins, and the date and time that the event ends.
- Click OK to save the event.
In your published calendar, a multi-day event with one start and one end time shows up only on the start date, such as here (in the List view):

Multi-day events with the same start and end times on each day
Example
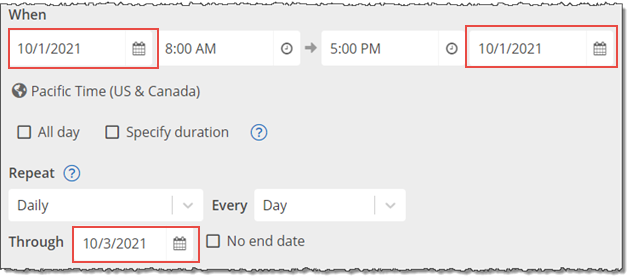
- A city parks department offers a three-day summer camp for kids between the ages of 5 to 9. The activities begin at 8am and end at 5pm each day.
How the setup looks
Setup instructions
- On the add/edit event form, on the Event Information tab, select the date and time that the multi-day event begins, and leave that same date for the end date.
- For Repeat, select Daily, and then for Every, select Day.
- For Through, select the date the multi-day event ends.
- Click OK to save the event.
In your published calendar, a multi-day event with start/end times for each day shows up as an individual event on each date, such as here (in the List view):

Multi-day events with different start and end times each day
Example
- A public library holds its annual book sale Thursday, 8am to 5pm, Friday, 8am to 4pm, and Saturday, 9am to 12pm.
How the setup looks
Set up the the first day of the multi-day event, and then scroll to the bottom of the form and click Create & Copy.
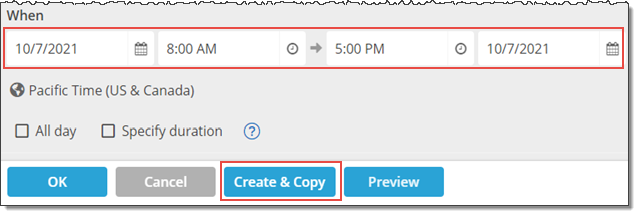
For the copy of the event, change the date and start/end times. Either click Create & Copy to create another copy with a different date and start/end time, or if it's the last instance of the multi-day event, click OK.

Setup instructions
- On the add/edit event form, on the Event Information tab, select the date and start/end times (or specify the duration) for the first day of the multi-day event.
- At the bottom of the add/edit event form, click Create & Copy.
This adds the first day event to the calendar, and leaves the add/edit event form open with the original setup information in place.
- For the copy of the event, change the date and start/end times (or specify the duration) for the second day event (plus any other information that differs from the first day event).
- To make another copy, repeat steps 2 and 3, or if this is the last instance of the multi-day event, click OK.
Here's an example of how a multi-day event might appear on your published calendar, with different daily start/end times (in the List view):

