Custom map pushpins
What you learn here
- Map pushpins overview
- How to prepare a custom pushpin image
- How to replace the default pushpin with a custom one
- Use different pushpins for different categories of events
Map pushpins overview
If you define map links for event locations, map pushpins indicate event venues in two published views:
- Map calendar view.
- Map thumbnail in event detail views.
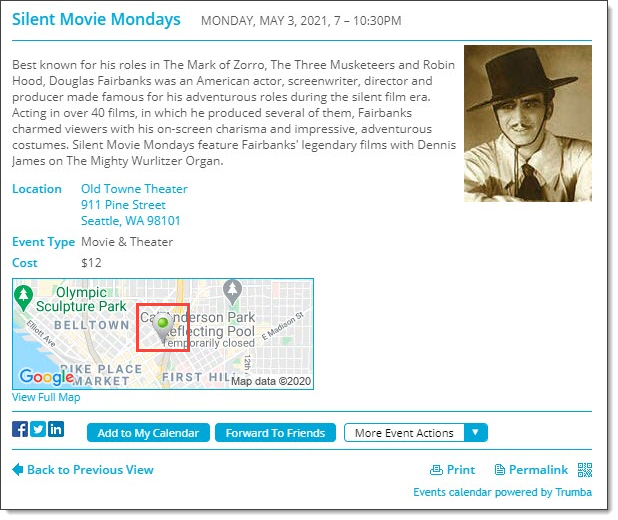
The default pushpin image looks like this:

Event detail view with default pushpin image in map thumbnail.
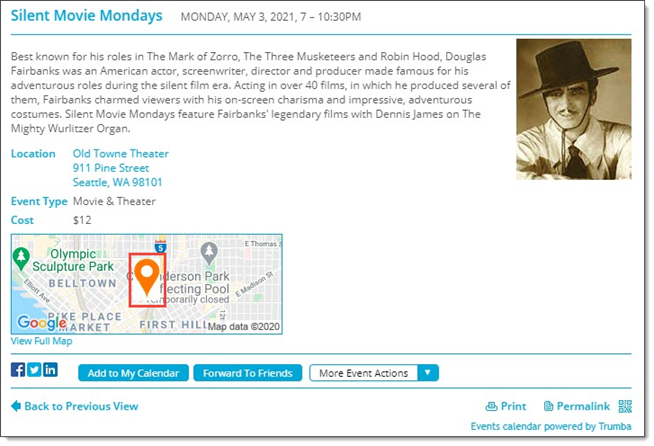
If you prefer, you can replace the default pushpin image with a custom image.

Event detail view with custom pushpin image in map thumbnail.
How to prepare a custom pushpin image
For a custom pushpin to look good in your published calendar views, it's important that you prepare the image properly before you upload it to Trumba® Connect.
- Create a custom pushpin image in the actual size you want it to appear in Map and event detail views.
No resizing takes place after you upload. (Just as a point of reference, the default Trumba pushpin is approximately 22 pixels wide by 32 pixels tall.)
Note The maximum pushpin image size for the map thumbnail image (displayed on the event detail view) is 4096 pixels (64 pixels wide by 64 pixels tall). Larger images for the pushpins are not displayed by Google Maps™.
- Save the image file with a transparent background in .png or .gif format.
A transparent background typically makes sense for a pushpin image but it's especially important if your calendar has a background color other than white.
How to replace the default pushpin with a custom one
Even if you want to use custom pushpins only in event detail views and you have no intention of publishing the Map calendar view, you still have to add a Map view to the list of available views on the Calendar Spuds tab. Map view is where you find the setting to replace the default pushpin with a custom one.
Tips
- Pushpin settings you apply in Map view automatically affect the map thumbnails in event details views. If you want custom pushpins only in Map view, you have to hide the map thumbnails in event detail views.
- If you want to use custom pushpins in detail view map thumbnails and not include Map view in the View Chooser spud, you can hide the Map view in the View Chooser. See step 5 in the instructions that follow.
The following instructions assume that you already published your calendar and that the calendar contains at least one future event. If you haven't added an event or published the calendar yet, do that now.
To replace the default pushpin with a custom one
- In the editing environment, make the calendar active to which you want to add custom pushpins. Click Publish Settings.
- In the Publishing Control Panel, click Calendar Spuds
- If you already added Map view to the Available Calendar Views list, find the view in the list, and then go on to step 4.
If you haven't yet added a Map view, click Add a Calendar View. Select Map, and then click OK.
- Find the Map view in the Available Calendar Views list, and then click Edit Settings & Styles.
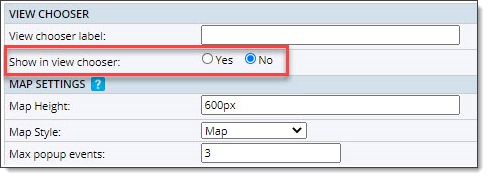
- On the Settings tab, if you want the custom pushpins to show up in detail view map thumbnails and you want to hide Map view in the View Chooser, in the View Chooser section, for Show in view chooser, select No.

View Chooser section, Map view Settings tab.
- In the Map Pushpins section, for Default Pushpin, click New to upload the custom pushpin image you created.

Map Pushpins section, Map view Settings tab.
If you need help uploading or you think you already uploaded a custom pushpin image, go here.
- If you intend to use the Map view on your website, scroll to the bottom of the form, and then click Preview to preview how existing mapped events look with the pushpin.
- When you're satisfied with the preview, close the preview window. Back on the Settings tab, click OK.
- If you intend to show map thumbnails in event detail views, on the Calendar Spuds tab, scroll down to the Event Detail View section. To confirm that the custom pushpin looks the way you want, click Preview, and then click an event title to see the detail view.
Tip If you don't see a map thumbnail in the detail view, at the bottom of the event detail box, click Edit Settings & Styles. On the Settings tab, in the Map Image section, for Show map image, select Yes.
Use different pushpins for different categories of events
You might want each event's map pushpin to reflect the type of event it represents. For example, a city sponsoring a music festival might want to indicate the venues for grunge, rap, and hard rock bands with different pushpin icons.
You have a couple of options for using category-specific pushpins:
- If you already created a list of choices custom field that associates each event category with an icon, you can use those same icons as map pushpins.
- If you have no existing field or you want to use unique pushpin icons, you can create a new list of choices custom field that associates each field value with a unique pushpin icon.
Before I do the steps, I'd like to read more about list of choices fields and custom field icons.
To use pushpins that reflect event categories
- If you want to create a new pushpin list of choices field, follow these instructions.
If you want to use icons associated with an existing field, go on to step 2.
- Follow these instructions for adding a Map view and opening the Map view Edit Settings page.
- On the Settings tab, in the Map Pushpins section, for Category Pushpins, select the list of choices field that references the pushpin icons you want to use.
Tip Remember that pushpin choices you make here affect both the Map calendar view and the map thumbnails in event detail views.
- Click OK.
- To confirm that the pushpin icons will look the way you want in your published views, preview the Map and event detail views.
